My last pattern release was the first in a series of four patterns using half square triangles, or HSTs. HSTs are incredible in that they can be used in so many different ways to create all kinds of different looks in a quilt. Their arrangement, fabric choice, and size can be made into a gorgeous quilt. But don’t worry if you’ve never made them before. They are a lot easier than they look if you have the right tools!
In this post I will walk you through a few different methods of how to make HSTs, with an explanation of their differences. In my next two posts, I will go over the scant 1/4″ that you’ll want to be using, and also how to trim your HSTs so that they are perfectly trimmed up and you won’t end up with any wonkiness in your quilt.
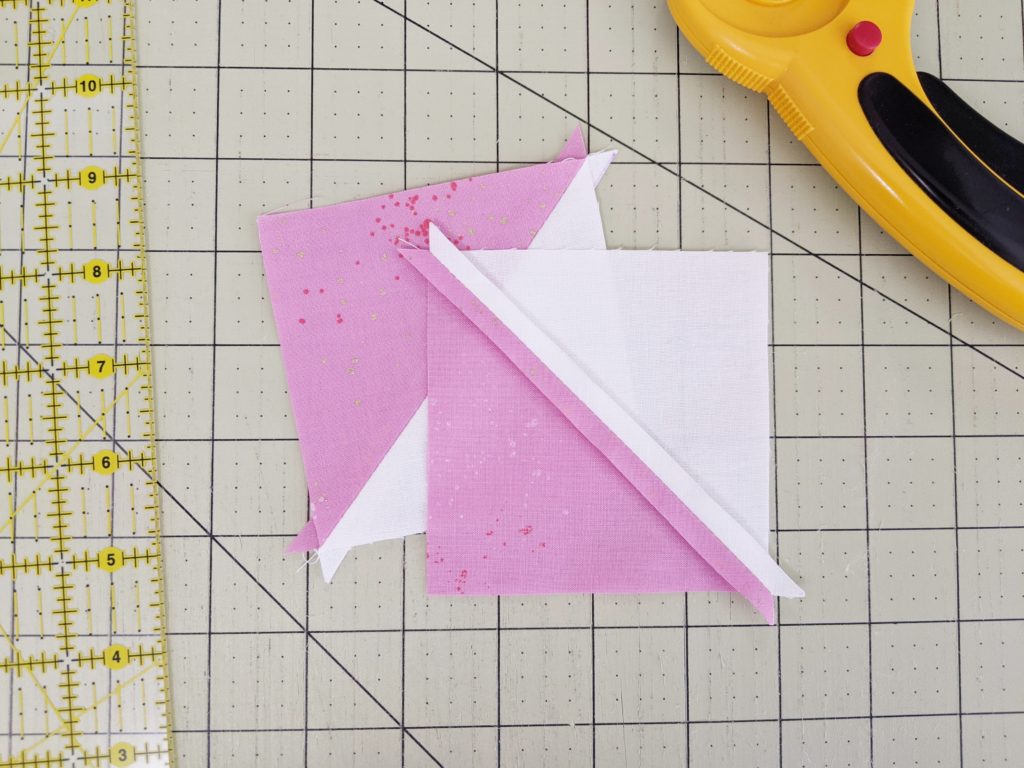
So, how do you make a half square triangle, you ask? Here’s how. We’re going to start here with the two-at-a-time method. Let’s say you want to make a 3″ HST (3.5″ unfinished HST). For this size, you’ll want to start with two 4″ squares. There are rules as to how much bigger to make your squares than your finished HST size (usually 7/8″), but I like to round up to give myself just a little extra trimming room, so I add 1″ to the size of finished HSTs that I want. It means I don’t have to be as perfect with my sewing, which in my world is a win. :) So now that you have your two squares, take one of them and on the wrong size, draw a line down the diagonal with a disappearing pen.

Line your two squares up, right sides together, and now sew a scant 1/4″ away from the line on each side. (Post coming soon for more information on the scant 1/4″!)

Once you are done sewing, you want to cut the HST on the line that you drew, right on the diagonal.

Here you get to make a choice – press your seam open or to one side (usually the darker side). My personal preference is to press them open, but it’s really up to you!
Now that you’ve got it pressed, you get to trim the HST, which will be my next post! Stay tuned!
There are a couple of other ways to sew up HSTs, including the four-at-a-time method and the eight-at-a-time method. The four-at-a-time method produces HSTs with bias edges, which I don’t recommend. Even with significant starching, they end up wonky or rippled for me. The eight-at-a-time method doesn’t give you bias edges, however, so let’s go through that one too!
For this method, to find the size squares you need, instead of just adding 1″ to the finished HST size, also double the number, i.e. (x + 1) * 2. If we want 3″ HSTs, then we should cut (3+1)*2 = 8″ squares. Next, instead of just marking one diagonal with your disappearing pen on the wrong side of one fabric, mark the other diagonal as well.

Now put the right sides together of your squares and you get to sew a scant 1/4″ on each side of each diagonal, i.e. four total lines.

Now at this point, it is helpful to have a rotating cutting mat, but if you don’t, it’s ok! Cut your block on each diagonal, and also across the middle of each size (4 cuts total). You should end up with 8 triangles.

Now you can press and trim just like in the two-at-a-time method, but you’ve made 8 HSTs all at once! Pretty cool! The only downside I see with this method is that if your pattern doesn’t need a number of HSTs that divides by eight, you’ll end up with extras that are wasted. But even so, it’s going to be a bit faster than the two-at-a-time method, even with chain piecing.
What is your favorite pattern that uses half square triangles?
I guess I’m confused about you saying “The eight-at-a-time method doesn’t give you bias edges”.
Each HST, created in the eight-at-a-time method, is a right angle triangle consisting of a 90° degree angled plane consisting of on-grain and cross-grain fabric edges (the north/south and east/west edges if you will), and two acute angles (the slanted plane or hypotenuse) – the slanted plane is a bias edge on each and every HST created using this method, it’s the same as for the two-at-a-time method as well.
You’re right! The difference is that the bias edge is sewn before it is cut, reducing the risk of a stretched seam. The four at a time method produces bias edges on the north/south and east/west edges, which can be difficult to then piece onto other units.
I had never seen the way to cut 8, I will use it . Thanks
I am a Triangle Queen and often make an entire yard of HST! There really is no limit to the number of HST you can make and they look so good between blocks as the sashing and the corners get some kick!
Thanks – love the way you make these!
Thank you for this tutorial. I usually hate cutting triangles but this makes it much easier to have them match up evenly.